Thursday, November 29, 2012
Burn Baby Burn: Slash 101 Calories in 10 Minutes
I find Oct, Nov, and Dec some of the most discouraging months of the year. Sure they are packed with memorable, fun-filled holiday festivities but with those festivities come an excess of mindless eating and drinking. And a season of busy schedules and not enough hours in the day. Gym? What gym.
For me it starts at Halloween. I have a sweet tooth so trying to keep my damn hand out of the candy bowl is near impossible. Insert: Gain 2 lbs. Then Thanksgiving. Dave's favorite holiday. Which translates to a menu that consisted of: mashed potatoes, sweet potatoes, stuffing, green bean casserole, rolls, turkey, and cranberry.
For two.
Followed by round 2 at a friend's house. Insert: Too many pounds to willingly admit. Think heavy knee bends after shimmying into my jeans.
And now the Christmas holiday is before my gut. I mean eyes. A few pounds heavier than my skin feels comfortable in and busier than ever.
Did you know that new research shows that a 165-pound women has to pare off 480 calories a day to lose 5 pounds in a month? Heavier (195 pounds)? Cut 515 calories a day. Lighter (135 pounds)? Trim 435. Crap. That seems impossible during the most wonderful time of the year, right?
Wrong.
No matter how busy we are, we all have at least 10 minutes. And in 10 minutes you can burn 101 calories with this at home, fat burning circuit. Do this daily, along with slash a few calories from your food intake, and you won't have to worry if that little black dress is still going to fit come party time -
1 minute of weight lifting: 7 calories (if you don't have free weights at home, use some cans of soup)
3 minutes of jump rope (no rope? Jump in place): 36 calories
3 minutes of jumping jacks: 29 calories
3 minutes of jogging in place: 29 calories
And if you're super motivated, add in 20 push-ups to bring some sexy back to those biceps.
Wondering how to slash calories from your everyday eating habits? It's easy. Here are a few examples to subtract (about) 100 calories:
Eliminate 2.5 slices of bacon from breakfast
Eat 1/2 cup less of brown rice from a stir-fry dinner
Don't add that extra 1 Tbsp. butter to that baked potato
Use 1 Tbsp. less of peanut butter on your sandwich
Don't eat those 5 extra Hershey kisses
And remember, nothing tastes as good as skinny feels! :)
Labels:
Dieting,
Fitness,
Holidays,
Motivation
Wednesday, November 21, 2012
Last Minute: Thanksgiving Dessert
Scrambling for a last minute Thanksgiving dessert idea that's not the same 'ol pumpkin or apple pie? This is sure to be a crowd pleaser. Salty meets sweet in this grand finale, which turns classic candy into a delectable tart with a custardy no bake filling. And don't stress, if you're crunched for time or the thought of making your own butter crust is daunting, a store bought pie crust will work as well.
~Salted Caramel Tart~
Ingredients:
For Butter Crust: Yields (2) 9 -inch crusts
3/4 cup (1 1/2 sticks) butter (no substitutions), cut up, room temperature
1/4 cup sugar
1/8 teaspoon salt
1 large egg, lightly beaten
1 teaspoon(s) vanilla extract
2 1/4 cup(s) all-purpose flour
For Salted Caramel Tart: Serves 12
1 teaspoon unflavored gelatin
4 tablespoon cold water
1 tablespoon light corn syrup
1 cup sugar
2 tablespoon sugar
2 tablespoons butter (no substitutions), cut up, room temperature
1/2 cup sour cream, room temperature
1 3/4 cups heavy cream
1/4 teaspoon salt
1 1/2 teaspoon vanilla extract
Currants, for garnish (optional)
Candied orange peel, for garnish (optional)
Directions:
For Butter Crust: Prep time: 15 min. Total time: 35 min.
2. With mixer on medium-low speed, beat in egg, then vanilla, until well incorporated, scraping side of bowl.
3. With mixer on low speed, gradually beat in flour. Beat just until incorporated and dough forms large clumps. Divide dough in half and form each half into a 1-inch-thick disk. Cover tightly with plastic wrap and refrigerate at least 1 hour or until firm. (Dough can be refrigerated up to 1 day or frozen up to 3 months so you can even make this now for the Christmas holiday.)
4. With hands and fingers, press dough into even layer against bottom and up side of 9-inch pie plate or tart pan with removable bottom. Freeze 10 minutes or until firm. (Dough in pan can be covered tightly with plastic wrap and frozen up to 1 month.)
5. When ready to bake, preheat oven to 375 degrees F.
6. Bake crust 20 minutes or until golden brown. If crust puffs up, very gently push down bubbles with spoon without cracking crust. Cool crust completely on wire rack.
For Salted Caramel Tart: Prep time: 15 min.
1. In small bowl, sprinkle gelatin over 2 tablespoons water. Let stand at least 5 minutes to soften.
2. In 4-quart saucepan, combine corn syrup, 1 cup sugar, and remaining 2 tablespoons water. Heat to boiling on medium-high, stirring to dissolve sugar. Cook without stirring until mixture is amber, swirling pan occasionally; remove from heat.
3. Carefully whisk in butter, a few pieces at a time, until incorporated. (Mixture will bubble up.) Whisk in sour cream, then 1/4 cup heavy cream, until well blended. Add salt, 1 teaspoon vanilla, and softened gelatin. Whisk until gelatin dissolves and mixture is very smooth. Transfer to bowl and cool to room temperature.
4. Whisk remaining 1 1/2 cups heavy cream with remaining 2 tablespoons sugar until soft peaks form. Whisk in remaining 1/2 teaspoon vanilla. Gently fold half of whipped cream (1 1/2 cups) into cooled caramel mixture. Spread caramel in even layer in cooled crust. Refrigerate at least 6 hours or up to 1 day to set. Cover and refrigerate remaining whipped cream.
5. To serve, top tart with remaining whipped cream and garnish with currants and orange peel.
Enjoy!!
Tuesday, November 20, 2012
Glam It Up: Thanksgiving Day Make-up
Step away from the oven and give yourself 20 minutes to make yourself look fall and festive with this BRONZY SMOKY EYE look on Thanksgiving Day:
Here's how:
1. Start out with a bit of foundation on the eyelids and set with loose powder. This will give your lids the perfect base to apply shadows and blend them flawlessly.
2. Take a medium to dark shimmery shade of either copper, bronze or slate and apply all over the lids up to the crease. Try MAC PRO Reflects in Antique Gold.
3. Using a clean soft brush, blend that out towards the temples. I like to blend up as well for a great smokey cat eye. Line all along the upper lash line with a black pencil and go thicker with the line towards the outer corners.
4. Using a small brush or Q-Tip, blend the top line a bit so that the liner blends into the shadow on the lid.
5. Curl lashes and apply a couple of coats of mascara. Try Lancome's Hypnose Drama mascara for great volume and length.
6. Clean off the under eye area with a makeup wipe. Apply concealer underneath the eyes. Try Smashbox High Definition Liquid Concealer.
7. Set concealer with a loose powder. Use the black pencil along the inner rim of the eyes and feel free to go outside of the inner rim and along the lower lashes just a bit.
8. Using the copper shadow on a smaller brush, smoke the lower lash line right below the black line. Blend with a clean brush so there are no harsh lines.
9. Finish the eyes with black mascara on the lower lashes as well.
Monday, November 19, 2012
Eat Up: Thanksgiving Munchies
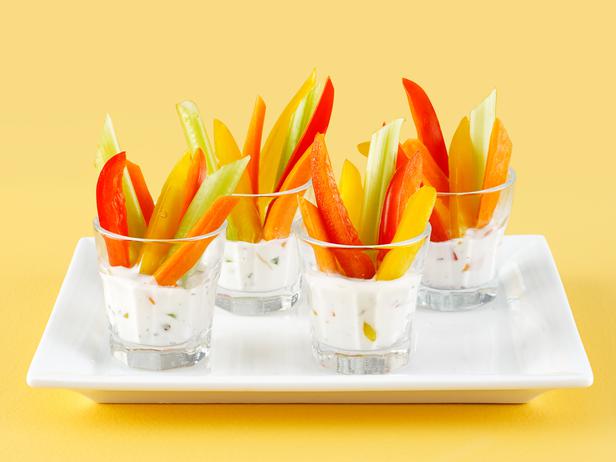
Looking for a healthy appetizer that won't spoil your guest's appetite? Look no further. This twist on a veggie tray not only displays well but requires little prep time, minimal ingredients and is low in calories and fat (depending on your choice of dip). God forbid you need a starchy appetizer before you indulge in the most caloric meal of the year!!
Fill each glass with your favorite dip, then add sliced carrots, celery sticks and pepper strips. Easy peasy. Kind of fun they look like turkey feathers too!
Friday, November 16, 2012
Bright Idea: Jar of Thanks
If you have guests joining, have them jot down one or two things they too are thankful for and drop them into the jar upon their arrival so they'll be included as well.
Thursday, November 15, 2012
Design It: Thanksgiving Centerpiece
Centerpiece #1:
Hurricane Vases
Corn Kernels
Small Red Beans
Green Split Peas
Candles
Jute String (optional)
Directions:
Place the candle in the empty hurricane, then begin pouring the beans in very slowly around the candle to the desired level. Repeat layers with different beans. Tie the Jute (or any other festive ribbon of your choice) around the hurricane.
Centerpiece #2:
Hurricane Vases
Corn Kernels
Tall Candles
Artifical Leaves (optional)
Jute String (optional)
Directions:
If you do not have hurricanes like the ones pictured that hold the candle up, then place a tall candle in the bottom of the empty hurricane. Then begin pouring the corn in very slowly around the candle to about 1/4 way up the candle. Tie the jute string around the leaf towards the top to secure it to the candle.
Love the simplistic look of the top picture? Simply fill hurricane with either hazelnuts, walnuts, or pecans. Stagger the amount of nuts in each container around each candle.
Labels:
Decor Crafts,
Design on a Dime,
Holidays
Wednesday, November 14, 2012
Bright Idea: Thanksgiving Leftovers
Having a house full on Thanksgiving? Wondering what's the best way for your guests to take home any left over food? That is if you're willing to give any away.
This week sometime, hit up your local craft store and pick up a handful of kraft paper takeout boxes and cute stick-on labels. I know Michaels carries them as does www.shopsweetlulu.com but you might have to pay for rush shipping*.
Before dinner, set up a leftover station to make dividing up the leftovers and clean-up quick and easy.
*Search for the "BioPak" takeout boxes on Sweet Lulu's website.
Sunday, October 28, 2012
Sweet Sunday
When fall hits (which it clearly hasn't in Southern California where it's still a sweaty 86 as I type), I crave apples. Maybe it's because I'm a born and raised Washingtonian that grows apples from far and wide but nonetheless, there is something about warm, gooey apple desserts that scream fall goodness.
I found this amazing Apple Bundt Cake over at a FarmGirl's Dabbles and personally think that it needs to be in everyone's fall baking rotation. It's moist, dense and filled with cinnamon-apple yumminess. The glaze is just plain fantastic, too. Its texture is thick and silky smooth. And the brown-butter lends it a deep almost caramel-like flavor, while the vanilla bean speckles tempt in the sweetest of ways.
~Apple Bundt with Brown-Butter Vanilla Bean Glaze~
Serves 12
Ingredients:
for the apple bundt:
1 T. butter and some flour for preparing the pan
4 medium apples – peeled, cored, & shredded (use the big holes on your grater), to make about 3-1/2 cups shredded apples – a mixture is best, maybe 2 Granny Smith, 1 Gala, and 1 McIntosh
1 T. fresh squeezed lemon juice
1-1/3 c. white sugar, divided
3 c. all-purpose flour
1 T. baking powder
1 T. cinnamon
1/2 tsp. mace
1/4 tsp. nutmeg
1 tsp. salt
1 c. brown sugar
1/2 c. vegetable oil
1/2 c. applesauce
4 large eggs
1/2 c. apple cider
2 tsp. vanilla
1 T. butter and some flour for preparing the pan
4 medium apples – peeled, cored, & shredded (use the big holes on your grater), to make about 3-1/2 cups shredded apples – a mixture is best, maybe 2 Granny Smith, 1 Gala, and 1 McIntosh
1 T. fresh squeezed lemon juice
1-1/3 c. white sugar, divided
3 c. all-purpose flour
1 T. baking powder
1 T. cinnamon
1/2 tsp. mace
1/4 tsp. nutmeg
1 tsp. salt
1 c. brown sugar
1/2 c. vegetable oil
1/2 c. applesauce
4 large eggs
1/2 c. apple cider
2 tsp. vanilla
for the brown-butter vanilla bean glaze:2 to 3 T. half and half
2 c. sifted powdered sugar
vanilla bean seeds scraped from 1/2 a vanilla bean (split bean lengthwise and scrape out seeds)
4 oz. butter
2 tsp. vanilla
2 c. sifted powdered sugar
vanilla bean seeds scraped from 1/2 a vanilla bean (split bean lengthwise and scrape out seeds)
4 oz. butter
2 tsp. vanilla
Directions:
For cake:
1) Preheat oven to 350°. Prepare a 12-cup bundt pan by smearing butter over every little nook and cranny of its interior. Then add some flour and tilt your pan so flour sticks to all of the buttery surface. Set pan aside.
2) Stir the shredded apple with lemon juice and 1/3 cup of the white sugar. Set aside.
3) In a medium bowl, whisk together the flour, baking powder, cinnamon, mace, nutmeg, and salt. Set aside.
4) In the bowl of a stand mixer, combine the remaining 1 cup white sugar, brown sugar, oil, applesauce, eggs, apple cider, and vanilla. Mix to combine. Then add the flour mixture and combine once again. Add the apples and mix until the apples are evenly distributed.
5) Pour into prepared Bundt pan and bake for 1 hour, or until a toothpick comes out of the cake clean. Cool the cake in the pan for 10 minutes, then invert onto your serving platter.
For glaze: If you are going to top the cake with the glaze, start making the glaze immediately, while the cake is still warm!
1) First, pour 3 tablespoons of half and half into a small bowl and set aside. This is just to take the chill off, while you prepare the rest of the glaze.
2) In a medium mixing bowl, combine the sifted (don’t skip the sifting!) powdered sugar and vanilla bean seeds. Set aside.
3) In a large saucepan over medium-low heat, warm the butter until golden brown. It should smell delicious and toasty. If it smells burnt, you went too far! This should take about 6 to 8 minutes.
4) Carefully pour browned butter into the powdered sugar and vanilla bean seeds, leaving the darkened butter sediment behind. Add 2 tablespoons of the half and half, then add the vanilla. Stir vigorously until smooth. You want the glaze to be somewhat thick, but easily pourable. If it seems too thick, add the remaining tablespoon of half and half.
5) Pour the glaze over the cake while both the glaze and cake are still warm!! The glaze cools quickly, so don’t delay! Let the glaze set. Then slice and enjoy!
Another option for serving this cake would be to finish it with a simple dusting of powdered sugar once it is cool. A dollop of slightly sweetened whipped cream or a scoop of vanilla bean ice cream would also be very good.
The cake fares well on the counter for a few days, covered with a cake dome.
Source: A Farmgirls Dabbles – The Bundt was adapted from Wanda’s Country Home. The glaze was adapted from Martha Stewart.
Friday, October 26, 2012
Ever realized?
I've never looked at these words in this way before. Makes total sense now, haha!!
Ever realized?
Woman has Man in it
Mrs. has Mr. in it
Female has Male in it
She has He in it
Madam has Adam in it
And ever notice how all of women's problems have to do with men?
MENtal illness
MENstrual cramps
MENtal breakdown
MENopause
GUYnecologist (ok alittle misspelled but you get the picture)
HISterectomy (again, technically misspelled)
Happy Friday to all you strong, capable women! Don't let those men bring you down.
Wednesday, October 24, 2012
Bang for your Buck
As I was fidgeting around the house this morning, picking up the same dang toys for the gazzillionth time, a random question popped into my mind - what's one item in the house that has given us the most bang for our buck?
I honestly didn't have to hesitate. I've got two very curious boys and they always like to see what's going on, open all things by themselves, and prop themselves up inside the sink so naturally the best $7.99 I've spent is on the Ikea "Bolmen" step stool.
Don't let the plastic fool you - it's sturdy. And I love that you can easily whip it down quickly and it's ok if left outside. Which is where I find it most days as the boys stand pulling on the fence gate string. Another reason I like the plastic is because it's lightweight. The boys can easily move it from room to room to get things without having to ask. Note to self; hide all candy and chemicals out of reach.
The Bolmen step stool can be found in the bathroom section @ Ikea. And yep, it's really only $7.99.
Do you have a household product that you get the most bang for your buck out of?
I honestly didn't have to hesitate. I've got two very curious boys and they always like to see what's going on, open all things by themselves, and prop themselves up inside the sink so naturally the best $7.99 I've spent is on the Ikea "Bolmen" step stool.
Don't let the plastic fool you - it's sturdy. And I love that you can easily whip it down quickly and it's ok if left outside. Which is where I find it most days as the boys stand pulling on the fence gate string. Another reason I like the plastic is because it's lightweight. The boys can easily move it from room to room to get things without having to ask. Note to self; hide all candy and chemicals out of reach.
The Bolmen step stool can be found in the bathroom section @ Ikea. And yep, it's really only $7.99.
Do you have a household product that you get the most bang for your buck out of?
Labels:
Child Equipment,
Children,
Have to Have,
Rave Reviews
Subscribe to:
Posts (Atom)