Showing posts with label Food. Show all posts

Wednesday, November 18, 2015

A Perfectly Prepared Meal

 
With Thanksgiving practically a week away, it's time to start prepping especially if you are hosting like I am. Thanks to this handy infographic from Savory, you don't have to stress over how many pounds of turkey to get for a 10 person dinner or how how much stuffing you should be preparing. Trust the chart, people will eat more pie than you think!!  

Friday, November 6, 2015

Helpful Holiday Must Have


Why hello!!!! Has it really been 8 months since my last blog post?!?! Unreal. Ok who am I kidding acting shocked. For those of you that have followed me in the past, you know this really isn't anything new. I get hot and post daily for a bit and then wham, it's like I fall off the face of the earth. In my defense, during this last hiatus, we built a custom home. You better believe this detailed oriented perfectionist had her hands in every last design decision. Luckily my husband and I are still married after the process and our four littles are alive and well. So between the building, the packing, the summer madnes, the school chaos, dealing with a traveling husband, shlepping around two year old devils, I mean twins, and now the holiday mayham, I'm lucky to even still be standing. But one thing lately that has kept me going...I joined a gym. It's been 4+ years since I've stepped into a gym. But this membership has nothing to do with getting back into the gym. I honestly despise the gym. But I love the childcare set up. Everyday, if I so choose, I can check the twins in and head over to the coffee shop for two whole hours. So here I sit. In utter silence, up to my eyeballs in Thanksgiving dinner coordination, Christmas card ordering, Amazon wishlists and Christmas party planning, loving every second of this "me" time.


So with no further ado, here is a holiday must have I just came across. I'll be hosting 20 people for Thanksgiving with only one oven. I know, I know. How do I build a brand new home with only one oven? Due to my lack of enthusiasm for cooking, I opted for two dishwashers instead. So what's a girl to do with the abundance of food that I'm expected to keep warm? But of course - the Betty Crocker 3-tier Oven Rack.


If this is something that will eliminate some stress in your kitchen this holiday season like it will mine, you can score this item on Amazon for 50% off!

Thursday, March 5, 2015

Guide to Healthier Baking

I'm not a baker. In fact, I don't enjoy cooking either. But when I do cook or bake, I'm notorious for trying to substitute all fatty, bad ingredients for healthier options. And 9/10 those cookies that I intended to give to the neighbors, were either thrown in the trash because they were so inedible or my kids ate them with that "what the heck are these?" looks on their faces. So instead of trying to wing it anymore (when I do bake that is), I found this recipe substitution guide helpful;

Healthy Recipe Substitutions: Baking 

Read more about these here: 83 Healthy Recipe Substitutions, via Greatist.

Or another thing I am notorious for is starting to bake assuming I have all the ingredients. Again 9/10 I don't. So this is another handy list to reference from All Recipes


Monday, February 23, 2015

Monday, February 16, 2015

Meals on the Go: 25 Three Ingredient Smoothie Options

Fire up your blenders, folks! While smoothies aren't anything new, they are a quick and convenient way to get a blast of nutrients, including protein, carbs and vitamins A, B, C and more. Thanks to the Daily Burn, here are 25 three ingredient smoothies that are nutritious, energizing and sure to satisfy every type of craving.

Monday, February 9, 2015

Sweet Sunday: Festive Valentine's Day Desserts

Valentine’s Day wouldn’t be complete without sweets for your sweeties. This year shower your little ones with love by making them an extra special homemade dessert. Whether you’ve got ten minutes or two hours to spare, we’ve got an option that your Valentines will love. Here are a few of my favorites from Susie Foresman's list over at Red Tricycle. These will make you want to eat your heart out!

Chocolate & Pink Vanilla M&Ms Bark


Get your mini chefs involved in whipping up this simple but impressive treat from Food Family & Finds—just melt some chocolate and candy melts, swirl them together, then let the littles go to town topping with sprinkles and candies and breaking it into bite-sized pieces. Click here to get the full recipe.

Deep Dish Red Velvet Cookies


Red velvet is the perfect pick for Valentine’s Day, and this recipe from Show Me the Yummy is an easy way to make your loved ones smile. It’s the perfect size for sharing, and it gets even tastier with the addition of vanilla ice cream and some chocolate syrup. To grab the recipe, click here.

Glazed Strawberry Muffins


For a lighter dessert, whip up these pretty muffins from Garnish & Glaze. With strawberries dotted throughout and a lightly sweetened glaze on top, this one is sure to be a hit with your whole crew. Click here to snag the recipe.

Raspberry Bites


If you don’t have time to break out the apron and make a dessert from scratch, no worries. Keep it simple and stress-free with this cute idea from Saucy’s Sprinkles. Just pop high-quality chocolate chips into raspberries and let your tots gobble them up. Click here for all the details.

Valentine Puppy Chow


If your kiddos are fans of classic puppy chow (AKA muddy buddies), chances are they’ll love this Valentine-themed twist on that classic snack from Whimsy & Hope. It’ll come together in ten minutes flat with red velvet cake mix, M&Ms, and chocolate. Click here for the full recipe.

White Chocolate Raspberry Mousse


Keep things a little lighter but just as festive with this delish mousse recipe from Something Swanky. It may look complicated, but it’s actually super easy to pull off using an instant pudding mix, cool whip, and some raspberries. To get the recipe, click here.

Didn't see any you liked, find more HERE

Wednesday, January 28, 2015

The Crock-pot of the Future (plus 33 three ingredient meals!)

Crock-Pot Smart Wifi-Enabled WeMo 6-Quart Slow Cooker 

I've said this before and I'll say it again -- I love the crock-pot. Wait. I should rephrase that. I love the idea of the crockpot. For some reason, I just don't use it like I should. And I know a lot of moms that feel the same. But I bet you have no clue that there is a crock-pot that can be told via smartphone what to do, when to do it.

Imagine being in a meeting or in the school pick up line and getting dinner started. Pretty rad if you ask me. With the free WeMo App you can adjust cooking time, temperature, turn on, shift to warm or turn off. Now that's how dinner should be done.


If you're needing some easy and effortless crock-pot meals, I love these 33 three ingredient slow cooker recipes from Totally The Bomb. With the Superbowl (GO SEAHAWKS!!!!) on Sunday, I think a must try is the Rootbeer Honey BBQ Wings. Yum!

As she says, "the crock-pot is a magical box that you put raw food in and wonderful meal pops out!" Why wouldn't we work these into our dinner rotation?!?!

To purchase the crock-pot above or read the rave reviews, click HERE.

Tuesday, January 27, 2015

Homemade and Healthy: Superbowl Party Dips

Recipes via SHAPE
Throw on the table with a spread of veggies, pita wedges and blue chips and you've got a plethora of healthy options to munch on while the Seahawks crush the Patriots!


Monday, June 2, 2014

Make It Monday: Margarita Chicken

 
Two things I love: margaritas and the crock pot (or slow cooker). Oh wait - chicken too! This Make it Monday post combines all three of those to make Margarita Chicken. And guess what? Your kids can not only eat it, they will love it too! No worries - there is no tequila in the recipe.

Thanks to Red Tricycle, I found this versatile, low fat chicken recipe from Crockpot Gourmet that you can serve over brown rice, couscous, quinoa or over a bed of greens with veggies and a citrus vinaigrette.

But let's talk crock pot though first. Four problems I see with the crock pot -

1) People don't use it enough. Hello....it's soooo easy. Throw in the ingredients (no thawing necessary), walk away and come back 4-8 hrs later to a homemade meal. Now why are you complaining about dinner again?!?!?

2) People think you have to be a "mom with kids" to use a crock pot. If you're single or a couple, just buy yourself a Food Saver and vacuum seal the leftovers. Note to moms; you too should do this. If you're already cooking, why not make a little more, vacuum seal the extra and wah-la you have yourself another meal on another night that will literally take seconds to heat up.

3) People associate "crock pot" with unhealthy. That's incredibly naïve. There are a gazillion recipes online and crock pot cookbooks that cater to people's dietary needs; vegetarian, low-carb, Paleo to name a few.

3) People think that once warm weather hits, that it's time to put the crock pot away. So not the case. Not all crock pot meals are cold weather soups and stews. In fact, there are several light, delicious summery meals that will save you from standing over the stove on a hot day.

Moral of the story - USE A CROCK POT. And make this meal. :)

Margarita Chicken
 
Ingredients:
  • 4 boneless skinless chicken breasts
  • 1/2 cup limeade (frozen limeade works)
  • 1/2 cup orange juice
  • 1 cup water or chicken broth
  • 3 cloves minced garlic
  • 1 teaspoon dried cilantro
  • 1/8 teaspoon cayenne pepper
  • salt and pepper to taste
Directions:
  1. Mix rice, limeade, orange juice, water, garlic and cilantro in bottom of crock
  2. Add chicken to crock and sprinkle the top part that is not covered by liquid with the cayenne pepper and salt and pepper
  3. Cover and cook on high for 3-4 hours or low for 6-8 hours
Note: You may want to use an oval crock for this so the liquid not be as deep and the chicken will not be submerged.

Friday, April 25, 2014

Food Friday: Spaghetti with Kale Pesto

 
Wondering how to incorporate kale - the health world's favorite dark, leafy green of 2014 - into your diet beyond kale chips and green smoothies? Here is a twist on spaghetti that will pump some serious vitamins into an average everyday meal.

~Spaghetti with Kale Pesto~
Recipe from Dr. Oz's "The Good Life" magazine

Prep time: 10 minutes
Cook time: 10 minutes
Makes 4 servings

Ingredients:

8 oz. kale (Tuscan if available), stemmed, leaves torn (5 cups loosely packed leaves)
1 clove garlic
1 cup grated Parmesan
1/2 cups raw almonds
1/2 tsp salt
1/4 tsp pepper
1 pinch crushed red pepper flakes
6 Tbsp olive oil
8 oz whole wheat spaghetti

Directions:

> Add the kale, garlic, Parmesan, almonds, salt, pepper and red pepper flakes to the bowl of a food processor. Pulse until very finely chopped, scraping down the sides of the bowl if necessary. Slowly add the olive oil with the machine running. Pulse until the mixture is thoroughly combined and smooth.

> Cook the pasta in salted water. Drain and reserve 1 cup pasta water.

> Add 3/4 cup pesto (any leftovers can be stored in the fridge for at least a week) and 2 Tbsp pasta water to a large bowl and stir to combine.  Add pasta and toss until thoroughly coated, adding more pasta water by tablespoon if necessary to form a creamy sauce.

>Enjoy!!

 
Did you know? Kale is being called “the new beef,” “the queen of greens” and “a nutritional powerhouse.” Here are ten great benefits of adding more kale to your diet:

1. Kale is low in calorie, high in fiber and has zero fat. One cup of kale has only 36 calories, 5 grams of fiber and 0 grams of fat. It is great for aiding in digestion and elimination with its great fiber content. It’s also filled with so many nutrients, vitamins, folate and magnesium as well as those listed below.

2. Kale is high in iron. Per calorie, kale has more iron than beef. Iron is essential for good health, such as the formation of hemoglobin and enzymes, transporting oxygen to various parts of the body, cell growth, proper liver function and more.

3. Kale is high in Vitamin K. Eating a diet high in Vitamin K can help protect against various cancers. It is also necessary for a wide variety of bodily functions including normal bone health and the prevention of blood clotting. Also increased levels of vitamin K can help people suffering from Alzheimer’s disease.

4. Kale is filled with powerful antioxidants. Antioxidants, such as carotenoids and flavonoids help protect against various cancers.

5. Kale is a great anti-inflammatory food. One cup of kale is filled with 10% of the RDA of omega-3 fatty acids, which help, fight against arthritis, asthma and autoimmune disorders.

6. Kale is great for cardiovascular support. Eating more kale can help lower cholesterol levels.

7. Kale is high in Vitamin A. Vitamin A is great for your vision, your skin as well as helping to prevent lung and oral cavity cancers.

8. Kale is high in Vitamin C. This is very helpful for your immune system, your metabolism and your hydration.

9. Kale is high in calcium. Per calorie, kale has more calcium than milk, which aids in preventing bone loss, preventing osteoporosis and maintaining a healthy metabolism. Vitamin C is also helpful to maintain cartilage and joint flexibility

10. Kale is a great detox food. Kale is filled with fiber and sulfur, both great for detoxifying your body and keeping your liver healthy.

Monday, April 21, 2014

Beating the Belly Blues

 
Hello again!!!! My apologizes for going MIA on y'all. I thought I would give myself some grace during the transition from two to four kids...overnight. We are nothing but overjoyed with the addition of our identical twin girls, Reese and Rio, but I'd be lying if I didn't admit that it's friggin' HARD work!!! There is nothing like doing multiple babies at ONE time. On top of attending to two active boys, ages 5 and just turned 3. It is anything but quiet around my hood.

Today however, I did have some time while my angels are napping and my boys are at school. I thought I'd log onto the blog and see what's shakin. Surprisingly, you're all still giving Hailey's Helpful Hints some love despite my absence. In fact - my one post "Tame the Tum - Spare Tire or Stress Bulge?" continues to get blown up on Pinterest! Who would have thought 4,946,000 people would be interested in such an article?? And no that's not a typo - 4 MILLION+ peeps. I too am shocked. And so thankful for the readers!!

So as I sat here thinking about what to blog on, I figured it's only appropriate to provide some helpful tips on something you all interested in - belly fat and bloating!

Sadly belly fat doesn’t just innocently sit under your skin and force you to loosen your belt another notch. It lives deep in your body, around your organs. And according to Dr. Oz, that deep fat is a troublemaker. It cranks out hormones and proteins that can trigger chronic inflammation and raise your risk of cardiovascular disease, type 2 diabetes, and even colon cancer.

Did you know?

You need to eat fat to lose fat. It’s time to stop being fat-phobic and start focusing on getting the right fats. Eating healthy monounsaturated and polyunsaturated fats - those are the types found in olive oil, avocados, and nuts - may trim what’s around your middle. One study found that people who got 25% of their daily calories from healthy fats gained less belly fat than people who ate fewer healthy fats.

Belly fat hates whole grains. That’s why you should love them. Refined grains like white pasta and white rice tend to feed a muffin top and may increase your risk for problems like diabetes, too. But eating whole grains like quinoa, barley, and whole wheat pasta might boost weight loss. In one study, people who included whole grains in their diets lost nearly eight pounds in 12 weeks, while refined-grain eaters lost only about six.

Belly fat thrives on stress. When the pressure's on, your body produces the "stress hormone" cortisol, which makes fat pile up around your midsection. Pretty discouraging when are surrounded by stress all day, everyday. Try these instant calmers and start getting stress under control in as little as 60 seconds.

Are you one of the many that wake up with a flat belly only to find that by the end of the day your stomach looks like you are 6 months pregnant? Ugh, isn't that the worst?? So many women are misled that they need to get on the floor and bust out 1,000 sit-ups. Not the case. According to gastroenterologist Dr. Robynne Chutkan, below is a step by step plan - that you can start today - to eliminate hidden causes of tummy trouble and beat your bloat in the kitchen.
 
Step 1: Start your day with an anti-bloat elixir - Many people are jinxing themselves right off the bat by reaching for bagels or sugary cereals first thing in the morning. These foods clog up your system and set you up for day-long gas buildup. Instead, get your system moving right away by blending together this fiber-rich elixir that helps food move through your digestive tract.
Aim to get 25 grams or more of fiber a day, but if you normally eat a low-fiber diet, start slow and gradually increase the amount. If you notice a little extra bloating at first, don't be deterred – most people's bodies will adjust to increased amounts of fiber over time.

Step 2: Supersize your lunch - Many people eat their biggest meal at dinner, but eating too late at night can cause a log jam in your gut. To help beat bloat, you should enjoy a three-course lunch instead. Make sure your lunch includes about 10 grams of fiber to help keep your food moving. Here's a good example of a fiber-rich, delicious lunch option:
  • First course: Salad (add in all your favorite veggies and a light dressing)
  • Main course: Grilled fish with sweet potato and a cup of steamed broccoli
Step 3: Eat a finely chopped dinner and avoid leftovers - Now that you've had your supersize lunch, go for a one-course, easy-to-digest dinner. Big meals and big bites can be hard for our bodies to digest in the evening. Chopped food can facilitate digestion and leaves less empty space trapped in the belly. A bowl of chopped chicken, veggies and rice is a great option.
The second dinner rule is no eating leftovers. You may think you're doing yourself a favor by bringing home your leftover food for later meals, but allowing certain starches like pasta, rice and potatoes to cool and then reheating them can change their molecular structure and make them more likely to plug up your colon and cause significant discomfort.

Step 4:  Cut out dairy - Unfortunately, to say goodbye to bloat, you may have to say goodbye to dairy as well. At some point in their lives, nearly 75% of people experience lactose intolerance, which may be permanent or temporary. A little bit of lactose intolerance can contribute a lot to bloat.
Here are some easy swaps for dairy lovers:
  • Drink almond milk instead of cow's milk in your coffee, cereal, or smoothies
  • Try coconut-milk ice cream instead of regular ice cream
  • Try vegan cheese instead of normal cheese
It's important to make sure you're still getting plenty of calcium in your diet, but you have plenty of non-dairy options. Among them are salmon, sardines, mineral water, oranges, almond milk, sesame seeds and many nuts.

Bonus tip: Try fennel seeds - If you need a quick remedy for sudden bloat, try fennel seeds. They help melt away gas bubbles and only cost pennies a pinch. Try chewing a half-teaspoon before every meal.

You can read more about busting bloat in Dr. Chutkan's book, Gutbliss: A 10-Day Plan to Ban Bloat, Flush Toxins, and Dump Your Digestive Baggage.

Friday, September 20, 2013

If you do one thing TODAY...

 
...you gotta to tune in tonight (Friday, 8/20/13) for the season premiere of Shark Tank at 9pm on ABC!!! My girl, Lynnae Schneller, a young entrepreneur from my hometown of Tacoma, WA, took her grandma's 100 year old pickle recipe to market and now Lynnae's Gourmet Pickles is blowing up! I am so so proud of this pickle princess!

Her pickles are legit. Some of the best I've ever tasted. The "Hot Mama" is a favorite in our house. So addicting with just the right amount of sweet and spice. Tip: Order in bulk. You will literally eat the entire jar as a snack.


"Mrs. Pickle" is the original recipe with a unique blend of sweet and sour. Again, better than any other pickle on the market.

So enough reading, get buying. And don't forget to watch these girls rock it tonight on Shark Tank!!

Thursday, March 7, 2013

Are you getting your "greens?"

 
I feel like everywhere I turn, everyone is obsessed about "getting their greens." Greens meaning spinach and kale. Swiss chard and bok choy. I feel like the whole green movement is like the fat free trend of the 90's. Its hot right now. I put it in the same bucket as "eating clean."  

And no I am not bashing anyone who eats clean or green. 90% of the time, I eat that way. I just get annoyed at all the people who talk about it. Or "pin" it. Just eat. Eat because of the health benefits. Not because you think if you pin it, people will perceive you as this raw, organic wonder woman who concocts amazing, healthy recipes and crafts all day, everyday. Not reality.  

Obviously a hot button for me. I'll stop.

There's no denying that greens are nutritious and more people should be incorporating leafy veggies into their daily diet. But many of those people don't even know where to begin to make them delicious. One of the freshest, fastest ways to get your greens is in a smoothie. Plus smoothies are a good gateway drink for vegetable-adverse kids.

Here are a few tips for the best results and recipes from Real Simple that will have you turning over a new leaf in no time. These are simple recipes that you can make from the things you already have at home. I personally would add Greek yogurt to any of these for a more creamy texture. And if you want to get really fancy, you could add chia or flax seeds. But again, I'm trying to keep this simple.

Tips:

1) Put the liquid in first. Surrounded by juice or water, the blender blades can move freely. Next add your greens with the chunks of fruit or vegetable going into the pitcher last.

2) Start slow. If your blender has speeds, start it on low to break up big pieces of fruit, then work your way up to high for a puree. For blenders with function buttons, pulse a few times before switching to the puree mode.

3) Thicken with ice. Added too much juice or coconut milk? Toss in a few ice cubes and voila!

Recipes:

Collard Greens Smoothie With Mango and Lime: Frozen mango and green grapes naturally sweeten this refreshing drink.

Ingredients:
2 tablespoons fresh lime juice
2 cups stemmed and chopped collard greens or spinach
1 1/2 cups frozen mango
1 cup green grapes

Directions: Combine the lime juice, ½ cup water, the collard greens, mango, and grapes in a blender and puree until smooth, about 1 minute, adding more water to reach the desired consistency.

Spinach Smoothie With Avocado and Apple: The avocado makes this smoothie creamy without any additional dairy.

Ingredients:
1 1/2 cups apple juice
2 cups stemmed and chopped spinach or kale
1 apple—unpeeled, cored, and chopped
1/2 avocado, chopped

Directions: Combine the apple juice, spinach, apple, and avocado in a blender and puree until smooth, about 1 minute, adding water to reach the desired consistency.

Kale Smoothie With Pineapple and Banana: Coconut milk, chopped pineapple, and banana add a tasty tropical twist.

Ingredients;
1/2 cup coconut milk
2 cups stemmed and chopped kale or spinach
1 1/2 cups chopped pineapple (about 1/4 medium pineapple)
1 ripe banana, chopped

Directions: Combine the coconut milk, ½ cup water, the kale, pineapple, and banana in a blender and puree until smooth, about 1 minute, adding more water to reach the desired consistency.
Spinach, Grape, and Coconut Smoothie: With just 3 ingredients and a handful of ice, you can whip up a delicious breakfast or snack in minutes.

Ingredients:
1 cup seedless green grapes
1 cup packed baby spinach
1/2 cup ice
1/4 cup coconut milk

Directions: Place the grapes, spinach, ice, and coconut milk in a blender. Blend until smooth and frothy.

Kale-Apple Smoothie: The apple juice and bananas mask the vegetable flavors so well, you’ll barely taste the kale.

Ingredients:
3/4 cup chopped kale, ribs and thick stems removed
1 small stalk celery, chopped
1/2 banana
1/2 cup apple juice
1/2 cup ice
1 tablespoon fresh lemon juice

Directions: Place the kale, celery, banana, apple juice, ice, and lemon juice in a blender.

Enjoy!!

Friday, February 22, 2013

Time to Toss: Food Expiration Dates

 
I can guarantee that almost everyone reading this right now, has a  jar of something pretty old lurking  in the back of the refrigerator. And that mystery jar usually contains some sort of ooey, gooey condiment. Regardless of the fact that I'm naturally a tosser and am constantly purging to satisfy my OCD, most all the condiments in the Dawson refrigerator get used on a consistent basis. Thanks partly to my hopeless attempts of drowning food my kids claim they hate but have never tried with ketchup or ranch.

But for the sake of this post, I went to my refrigerator to unveil my mystery jar. And there she was. The Vegenaise spread. Think yellow-tinged mayo. Funny thing is I'm not Vegan. Nor do I intend to be. But for some reason something was telling me I should be. So I went out and spent a sh*t pot of money at Whole Foods only to walk out with an itty-bitty bag of "alternatives." That are sadly now past their prime but because I know how much money I spent on them, I can't pull myself to throw them away. Umph.

Which got me thinking about the shelf life of the other condiments stocked in my pantry and sitting in my refrigerator. Curious to know? You've come to the right spot. I've picked a handful of staples but for further reading on thousands of other items, check out StillTasty’s guidelines.

Ketchup

Unopened: 12 months in the pantry.
Opened: 6 months in the refrigerator, 1 month in the pantry.

While you see opened bottles of ketchup sitting out on restaurant tables, it’s best to store your own ketchup (which probably gets used less often) in your refrigerator.

Mayonnaise

Unopened: 3-4 months after the sell-by date on the package.
Opened: 2-3 months after the sell-by date on the package.

Sell-by dates represent the manufacturer’s estimate of how long the product will be at peak quality. In most cases, opened food is safe to consume after a sell-by date if it has been stored properly and continuously refrigerated.

Barbecue Sauce

Unopened: 12 months in the pantry.
Opened: 4 months in the refrigerator. One month in the pantry.

Store opened barbecue sauce in the refrigerator to extend its shelf life. Toss any sauce that develops an off color or scent.

Mustards - All types

Unopened: 2 years in the pantry.
Opened: One year in the refrigerator. 1-2 months in the pantry.

Opened mustard has a very long shelf life (one year!) when stored in the refrigerator. Toss any mustard that develops an off color or scent.

Relish

Unopened: 2 years in the pantry.
Opened: One year in the refrigerator.

Like mustard, opened relish has a long shelf life when refrigerated. If relish develops an off color, odor or appearance, discard it.

Creamy Salad Dressings - Ranch, Blue Cheese, Thousand Island

Unopened: 12-18 months in the pantry.
Opened: 6-9 months in the refrigerator.

Creamy dressings must be refrigerated after opening. If mold appears, discard the entire product.

Vinaigrette Dressings - Italian, Balsamic

Unopened: 12-18 months in the pantry.
Opened: 6-9 months in the refrigerator.

If your salad dressing develops an off color, odor or appearance, discard it.

Pickles - All types

Unopened: 2 years in the pantry.
Opened: 1 year in the refrigerator.

If your pickles develop an off color, odor or appearance, discard it.

Salsa - Fresh, store bought in the refrigerated section

Unopened: 10 to 14 days (or date on package) in the refrigerator, 1 to 2 months in the freezer.
Opened: 5 to 7 days in the refrigerator or 1 to 2 months in the freezer.

Fresh store-bought salsa should ideally be eaten when you open it. If you do have leftover salsa, freeze it in an airtight container or heavy-duty freezer bag.

Salsa or Picante Sauce - Store bought, sold unrefrigerated

Unopened: 12-18 months in the pantry.
Opened: 1 month in the refrigerator, 1 to 2 months in the freezer.

Jarred salsa is cooked, so it has a longer shelf life than the fresh kind. Discard salsa or picante sauce with an off color, odor or appearance.

Tartar Sauce

Unopened: 12 months in the pantry.
Opened: 6 months in the refrigerator.

Creamy condiments should always be refrigerated when opened. Discard tartar sauce with an off color, odor or appearance.

Hot Sauce - Most brands

Unopened: 5 years in the pantry/
Opened: 5 years in the refrigerator.

Discard hot sauce with an off color, odor or appearance.

Olives - Ripe in oil

Opened: 2-3 months in the refrigerator

Keep olives submerged in liquid after opening. Discard if they develop an off color, odor or appearance.

Olives - Green or black, canned

Unopened: 2-3 years in the pantry.
Opened: 1 year or date on can.

Keep olives submerged in brine after opening. Discard if they develop an off color, odor or appearance.

Doesn't cleaning out the refrigerator sound so fun this weekend!?!?!


Saturday, December 15, 2012

Sweet Sunday: Spiced Cranberry Coffee Cake

 
Great for breakfast, brunch, tea or dessert. A holiday staple.
 
~Spiced Cranberry Coffee Cake~
 
Ingredients:
 
3/4 cup(s) (1 1/2 sticks) unsalted butter, at room temperature, plus more for the pan
3 cup(s) all-purpose flour, plus more for the pan     
1 1/2 teaspoon(s) baking powder
1 1/2 teaspoon(s) baking soda
1 teaspoon(s) kosher salt
1 1/2 cup(s) granulated sugar
3 large eggs
1 1/2 cup(s) lowfat buttermilk
2 teaspoon(s) grated orange zest
2 cup(s) Spiced Cranberries or store-bought cranberry sauce
1 cup(s) roughly chopped walnuts
1 1/4 cup(s) confectioners' sugar
3 tablespoon(s) milk

Directions:

1. Heat oven to 350 degrees F. Coat a 9- by 13-inch baking dish with butter and lightly dust with flour. In a medium bowl, whisk together the flour, baking powder, baking soda, and salt.

2. Using an electric mixer, beat the butter and granulated sugar in a large bowl until light and fluffy, about 3 minutes. Beat in the eggs, then the buttermilk and orange zest. Reduce the mixer speed to low and gradually add the flour mixture, mixing just until incorporated.

3. Spread half the batter into the prepared baking dish. Dollop 1 cup cranberry sauce over the top, then gently spread, swirling it into the batter. Top with the remaining batter, then dollop with the remaining cranberry sauce.

4. Sprinkle the walnuts over the top and bake until the cake is golden brown and a pick inserted into the center comes out clean, 45 to 50 minutes. Let cool for 5 minutes.

5. While the cake cools, make the icing: In a small bowl, whisk together the confectioners' sugar and milk until smooth. Drizzle the icing over the warm cake, then let cool completely before serving.

I hope this ends your weekend on a sweet note!

Thursday, December 13, 2012

Party Pleasers: Little Cuties

 
I love the idea of Little Cuties. Translation: Fruit, custard, cream or meringue mini-pies baked in ½-pint, oven-safe mason jars. What a perfectly portioned treat. Just press the crust into the containers (available at Amazon, Walmart, even your hardware store). Choose a canned filling or whip one up yourself. Come dessert time, there’s no need to cut and serve. “People can grab a jar and dig right in,” says Shaina Olmanson, author of Desserts in Jars: 50 Sweet Treats That Shine. “They’re great for parties.” And your waistline - as long as you eat just one. Great as gifts too!

:: 2 Crowd Pleasing Little Cutie Ideas :: 

Mini Apple Pies: Who doesn't love apple pie!?!?

Ingredients:

2 boxes refrigerated pie crusts
8 Tbsp. butter
1/4 C flour
1/4 C granulated sugar
1/4 C brown sugar
1 Tbsp lemon juice
1 tsp cinnamon
1/4 tsp nutmeg
1/8 tsp salt
6 C sliced apples
1/2 C dried cranberries (optional)

Directions:

1. Heat oven to 350° and set out 8 wide-mouth 8 oz jars. Cut out eight 6-inch circles and eight small circles (using jar lid as guide) from 2 boxes refrigerated pie crusts. Press into bottom, up side and over the lip of jars.

2. In saucepan, melt 8 tbsp butter over medium-high heat. Stir in 1/4 cup all-purpose flour and cook, whisking continuously, until golden brown, 2 minutes. Add 1/4 cup each granulated sugar and brown sugar, 1 tbsp lemon juice, 1 tsp cinnamon, 1/4 tsp nutmeg and 1/8 tsp salt and bring to a simmer. Remove from heat and pour over 6 cups peeled, cored and thinly sliced apples and, if desired, 1/2 cup dried cranberries. Toss to coat. Spoon into jars.

3. Cut small dough circles into strips; weave into lattice and crimp edges. Brush with lightly beaten egg and sprinkle with turbinado sugar. Place jars 2 inches apart on large baking sheet. Bake at 350° for 45 to 55 minutes or until golden. Allow to cool.

Lemon Meringue Pies with a Thyme-Shortbread Crust : Herbed shortbread becomes the crust for this classic lemon meringue pie, adding a bit of a twist on an old favorite. These tiny treats will win the hearts of the lemon lovers in your life.

Ingredients:

For the shortbread crusts:
8 tablespoons (1 stick) unsalted butter, softened
1/3 cup sugar
1 cup all-purpose flour
1 tablespoon cornstarch
2 teaspoons fresh thyme leaves

For the lemon filling:
2 cups sugar
1/2 cup cornstarch
1/2 teaspoon salt
3 cups water
1 cup fresh lemon juice, from about 4 lemons
Grated zest of 4 lemons
4 tablespoons (1/2 stick) cold unsalted butter, cut into small pieces
8 large egg yolks, beaten

For the meringue:
8 large egg whites
1/2 cup sugar

Makes 10 individual lemon meringue pies

Directions:

1. Make the dough for the crusts: Cream together the butter and sugar until light and fluffy, 2 to 3 minutes on medium-high speed. Mix together the flour, cornstarch, and thyme in a separate bowl. Add the flour mixture to the butter and mix until incorporated.

2. Have ready eight wide-mouthed 8-ounce jars. Turn out the dough onto a piece of parchment paper. Shape the dough into a long cylinder with a diameter 1/2 inch smaller than the diameter of the jars you are using. Refrigerate for at least 2 hours.

3. Preheat the oven to 350ºF. Slice 1/4-inch slices of dough from the roll and place a slice in the bottom of each jar. Place the jars 2 inches apart on a large baking sheet. Bake the crusts for 10 minutes until just lightly golden. Remove from the oven and set aside.

4. Make the filling: Combine the sugar, cornstarch, and salt in a medium-size saucepan. Mix in the water, lemon juice, and lemon zest. Bring to a boil over medium heat, and stir in the butter until it is melted. Place the egg yolks in a heatproof bowl. Slowly pour 1/2 cup of the lemon mixture into the egg yolks, whisking continuously to temper the eggs. Whisk the egg yolks into the saucepan. Bring to a boil again and continue to cook over medium-high heat until the lemon filling is thick, about 5 minutes. Spoon the filling into the warm jars over the crust.

5. Make the meringue: In a large bowl, beat the egg whites until foamy. Beat in the sugar 1 tablespoon at a time until all is incorporated. Beat at medium-high speed until stiff peaks form. Spoon or pipe the meringue over the lemon filling in the jars, mounding it in the center to create peaks.

6. Place the jars 2 inches apart on a large baking sheet. Bake the pies for 10 minutes, or just until the meringue is golden brown. Remove from the oven, let cool completely, and chill in the refrigerator for at least 2 hours. Serve cold.

Wednesday, December 12, 2012

Goodies to Gift: Festive & Edible

 
Give the sweetest present this year; yummy treats wrapped in pretty packages!

:: Sweet ::

Peppermint Bark : 2 pounds (4 small tins) at $1.96 each

Chocolate-Peppermint Cake Pops : 48 pops at $.23 each

Layered Chocolate Cookie Mix : 1 jar at $7.33 each; 3 1/2 dozen baked cookies

Marbled Walnut Fudge : 4 dozen pieces at $4.01/dozen

Mixed Berry Granola : About 6 cups at $1.98 per cup

Cranberry-Poppyseed Biscuits : three 2 3/4 cup bags at $1.55 each

:: Salty ::

Chunky Salsa : Makes 10 cups at $1.53

Trio of Rubs : 1 jar (11 teaspoons) at $1.50 each

:: Fast and Easy Gift Packaging Ideas :: Raid your pantry and drawers for these items to repurpose on the fly...

Mason or other lidded glass jars: These are ideal for holding homemade candies, nuts and other small bites. Just sterilize with a quick boiling water bath first. A ribbon around the top makes it extra special.

Brown paper bags: Use lunch sacks or cut apart large bags to make wrapping paper. Add a gingerbread "icing" border around the top of the package with a white pen or white out. If you gift wrap, you can use yarn or stamps to do something other than ribbon.

Shoe, jewelry or other boxes: Pick a box based on the size or amount of your to-be-gifted treats. Wrap in paper and line with tissue or wax paper. No one will notice what the box originally held.

Dish towels or cloth napkins: If you have spares - or one in set that's not stained - bundle it around your sealed backed goods especially breadas and tie with twine or burlap ribbon. An old recipe card makes a perfect gift tag.

Oatmeal canisters: Cylinders are great for small items and easy to wrap. Roll in paper, cut it and tape it. Or create "candy wrapper" ends by gathering excess paper on either side of the tube with ribbon.

Decorative tin cans: If you don't have anything lying around the house, hit up the $1 store and pick yourself up a holiday tin can. Line with tissue paper or wax paper and you have an inexpensive,

Take-out boxes or favor boxes: Available at any craft store, with a lid or just the scalloped top ($20 for 50 at partycity.com) Line with food safe cellophane, tie with a stitched grosgrain ribbon and wah-la!

Wednesday, November 21, 2012

Last Minute: Thanksgiving Dessert

 
Scrambling for a last minute Thanksgiving dessert idea that's not the same 'ol pumpkin or apple pie? This is sure to be a crowd pleaser. Salty meets sweet in this grand finale, which turns classic candy into a delectable tart with a custardy no bake filling. And don't stress, if you're crunched for time or the thought of making your own butter crust is daunting, a store bought pie crust will work as well.
 
~Salted Caramel Tart~
 
Ingredients:
 
For Butter Crust: Yields (2) 9 -inch crusts
 
3/4 cup (1 1/2 sticks) butter (no substitutions), cut up, room temperature
1/4 cup sugar             
1/8 teaspoon salt
1 large egg, lightly beaten     
1 teaspoon(s) vanilla extract
2 1/4 cup(s) all-purpose flour

For Salted Caramel Tart: Serves 12

1 teaspoon unflavored gelatin                                                                                                               
4 tablespoon cold water
1 tablespoon light corn syrup
1 cup sugar
2 tablespoon sugar
2 tablespoons butter (no substitutions), cut up, room temperature      
1/2 cup sour cream, room temperature
1 3/4 cups heavy cream
1/4 teaspoon salt
1 1/2 teaspoon vanilla extract
Currants, for garnish (optional)     
Candied orange peel, for garnish (optional)     
 
Directions:
 
For Butter Crust: Prep time: 15 min. Total time: 35 min.
 
1. In large bowl, with mixer on medium speed, beat butter, sugar, and salt until pale yellow and well blended, occasionally scraping bowl with rubber spatula.

2. With mixer on medium-low speed, beat in egg, then vanilla, until well incorporated, scraping side of bowl.

3. With mixer on low speed, gradually beat in flour. Beat just until incorporated and dough forms large clumps. Divide dough in half and form each half into a 1-inch-thick disk. Cover tightly with plastic wrap and refrigerate at least 1 hour or until firm. (Dough can be refrigerated up to 1 day or frozen up to 3 months so you can even make this now for the Christmas holiday.)

4. With hands and fingers, press dough into even layer against bottom and up side of 9-inch pie plate or tart pan with removable bottom. Freeze 10 minutes or until firm. (Dough in pan can be covered tightly with plastic wrap and frozen up to 1 month.)
 
5. When ready to bake, preheat oven to 375 degrees F.

6. Bake crust 20 minutes or until golden brown. If crust puffs up, very gently push down bubbles with spoon without cracking crust. Cool crust completely on wire rack.

For Salted Caramel Tart: Prep time: 15 min.

1. In small bowl, sprinkle gelatin over 2 tablespoons water. Let stand at least 5 minutes to soften.

2. In 4-quart saucepan, combine corn syrup, 1 cup sugar, and remaining 2 tablespoons water. Heat to boiling on medium-high, stirring to dissolve sugar. Cook without stirring until mixture is amber, swirling pan occasionally; remove from heat.

3. Carefully whisk in butter, a few pieces at a time, until incorporated. (Mixture will bubble up.) Whisk in sour cream, then 1/4 cup heavy cream, until well blended. Add salt, 1 teaspoon vanilla, and softened gelatin. Whisk until gelatin dissolves and mixture is very smooth. Transfer to bowl and cool to room temperature.

4. Whisk remaining 1 1/2 cups heavy cream with remaining 2 tablespoons sugar until soft peaks form. Whisk in remaining 1/2 teaspoon vanilla. Gently fold half of whipped cream (1 1/2 cups) into cooled caramel mixture. Spread caramel in even layer in cooled crust. Refrigerate at least 6 hours or up to 1 day to set. Cover and refrigerate remaining whipped cream.

5. To serve, top tart with remaining whipped cream and garnish with currants and orange peel.

Enjoy!!

Monday, November 19, 2012

Eat Up: Thanksgiving Munchies


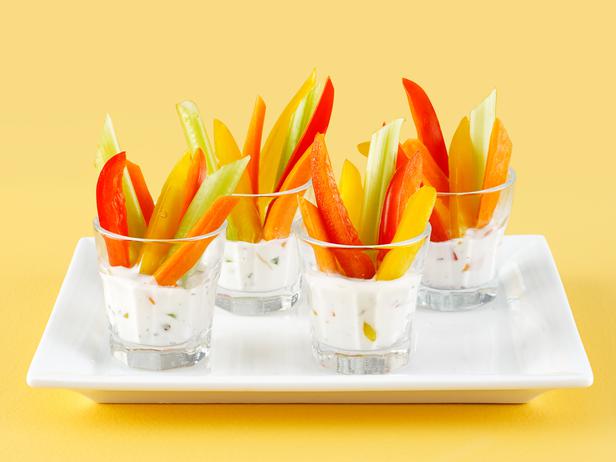
Looking for a healthy appetizer that won't spoil your guest's appetite? Look no further. This twist on a veggie tray not only displays well but requires little prep time, minimal ingredients and is low in calories and fat (depending on your choice of dip). God forbid you need a starchy appetizer before you indulge in the most caloric meal of the year!!

Fill each glass with your favorite dip, then add sliced carrots, celery sticks and pepper strips. Easy peasy. Kind of fun they look like turkey feathers too!

Wednesday, November 14, 2012

Bright Idea: Thanksgiving Leftovers


Having a house full on Thanksgiving? Wondering what's the best way for your guests to take home any left over food? That is if you're willing to give any away.

This week sometime, hit up your local craft store and pick up a handful of kraft paper takeout boxes and cute stick-on labels. I know Michaels carries them as does www.shopsweetlulu.com but you might have to pay for rush shipping*.

Before dinner, set up a leftover station to make dividing up the leftovers and clean-up quick and easy.

*Search for the "BioPak" takeout boxes on Sweet Lulu's website.