Pages

Sunday, October 28, 2012

Sweet Sunday


When fall hits (which it clearly hasn't in Southern California where it's still a sweaty 86 as I type), I crave apples. Maybe it's because I'm a born and raised Washingtonian that grows apples from far and wide but nonetheless, there is something about warm, gooey apple desserts that scream fall goodness.

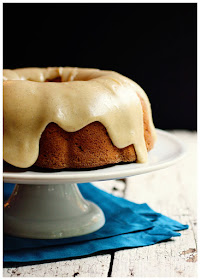
I found this amazing Apple Bundt Cake over at a FarmGirl's Dabbles and personally think that it needs to be in everyone's fall baking rotation. It's moist, dense and filled with cinnamon-apple yumminess. The glaze is just plain fantastic, too. Its texture is thick and silky smooth. And the brown-butter lends it a deep almost caramel-like flavor, while the vanilla bean speckles tempt in the sweetest of ways.

~Apple Bundt with Brown-Butter Vanilla Bean Glaze~
Serves 12
 
Ingredients:
 
for the apple bundt:
1 T. butter and some flour for preparing the pan
4 medium apples – peeled, cored, & shredded (use the big holes on your grater), to make about 3-1/2 cups shredded apples – a mixture is best, maybe 2 Granny Smith, 1 Gala, and 1 McIntosh
1 T. fresh squeezed lemon juice
1-1/3 c. white sugar, divided
3 c. all-purpose flour
1 T. baking powder
1 T. cinnamon
1/2 tsp. mace
1/4 tsp. nutmeg
1 tsp. salt
1 c. brown sugar
1/2 c. vegetable oil
1/2 c. applesauce
4 large eggs
1/2 c. apple cider
2 tsp. vanilla
 
for the brown-butter vanilla bean glaze:2 to 3 T. half and half
2 c. sifted powdered sugar
vanilla bean seeds scraped from 1/2 a vanilla bean (split bean lengthwise and scrape out seeds)
4 oz. butter
2 tsp. vanilla
 
Directions:
 
For cake:
1) Preheat oven to 350°. Prepare a 12-cup bundt pan by smearing butter over every little nook and cranny of its interior. Then add some flour and tilt your pan so flour sticks to all of the buttery surface. Set pan aside.
 
2) Stir the shredded apple with lemon juice and 1/3 cup of the white sugar. Set aside.
 
3) In a medium bowl, whisk together the flour, baking powder, cinnamon, mace, nutmeg, and salt. Set aside.
 
4) In the bowl of a stand mixer, combine the remaining 1 cup white sugar, brown sugar, oil, applesauce, eggs, apple cider, and vanilla. Mix to combine. Then add the flour mixture and combine once again. Add the apples and mix until the apples are evenly distributed.
 
5) Pour into prepared Bundt pan and bake for 1 hour, or until a toothpick comes out of the cake clean. Cool the cake in the pan for 10 minutes, then invert onto your serving platter.
 
For glaze: If you are going to top the cake with the glaze, start making the glaze immediately, while the cake is still warm!
 
1) First, pour 3 tablespoons of half and half into a small bowl and set aside. This is just to take the chill off, while you prepare the rest of the glaze.
 
2) In a medium mixing bowl, combine the sifted (don’t skip the sifting!) powdered sugar and vanilla bean seeds. Set aside.
 
3) In a large saucepan over medium-low heat, warm the butter until golden brown. It should smell delicious and toasty. If it smells burnt, you went too far! This should take about 6 to 8 minutes.
 
4) Carefully pour browned butter into the powdered sugar and vanilla bean seeds, leaving the darkened butter sediment behind. Add 2 tablespoons of the half and half, then add the vanilla. Stir vigorously until smooth. You want the glaze to be somewhat thick, but easily pourable. If it seems too thick, add the remaining tablespoon of half and half.
 
5) Pour the glaze over the cake while both the glaze and cake are still warm!! The glaze cools quickly, so don’t delay! Let the glaze set. Then slice and enjoy!
 
Another option for serving this cake would be to finish it with a simple dusting of powdered sugar once it is cool. A dollop of slightly sweetened whipped cream or a scoop of vanilla bean ice cream would also be very good.
 
The cake fares well on the counter for a few days, covered with a cake dome.

Source: A Farmgirls Dabbles – The Bundt was adapted from Wanda’s Country Home. The glaze was adapted from Martha Stewart.
Friday, October 26, 2012

Ever realized?


I've never looked at these words in this way before. Makes total sense now, haha!!  

Ever realized?

Woman has Man in it

Mrs. has Mr. in it


Female has Male
 in it

She has He
 in it

Madam has Adam in it


And ever notice how all of women's problems have to do with men?

MEN
tal illness

MEN
strual cramps 

MEN
tal breakdown 

MENopause

GUYnecologist (ok alittle misspelled but you get the picture)

HISterectomy (again, technically misspelled)

Happy Friday to all you strong, capable women! Don't let those men bring you down.

Wednesday, October 24, 2012

Bang for your Buck

As I was fidgeting around the house this morning, picking up the same dang toys for the gazzillionth time, a random question popped into my mind - what's one item in the house that has given us the most bang for our buck?

I honestly didn't have to hesitate. I've got two very curious boys and they always like to see what's going on, open all things by themselves, and prop themselves up inside the sink so naturally the best $7.99 I've spent is on the Ikea "Bolmen" step stool.

Don't let the plastic fool you - it's sturdy. And I love that you can easily whip it down quickly and it's ok if left outside. Which is where I find it most days as the boys stand pulling on the fence gate string. Another reason I like the plastic is because it's lightweight. The boys can easily move it from room to room to get things without having to ask. Note to self; hide all candy and chemicals out of reach.

The Bolmen step stool can be found in the bathroom section @ Ikea. And yep, it's really only $7.99.

Do you have a household product that you get the most bang for your buck out of?

Sunday, October 21, 2012

Sweet Sunday

 
Rich in antioxidants, high in fiber, and loaded with vitamins, this festive marriage of chocolate and pumpkin is delish. Dig in and savor the season!

~Pumpkin Swirl Brownies~
Adopted by Marta Stewart

Ingredients:
1/2 cup (1 stick) butter
6 oz. semisweet chocolate, chopped, or 1 cup chocolate chips
4 large eggs
1 1/2 cups sugar
2 tsp. vanilla
2 cups all-purpose flour
1 tsp. baking powder
1/2 tsp. salt
1 cup pumpkin puree
3 Tbsp. canola oil
1 tsp. cinnamon
1/4 tsp. ground nutmeg

Directions:
1) Preheat the oven to 350F and spray a 9″x9″ cake pan with nonstick spray.

2) In a small saucepan, melt the butter over medium heat. Add the chocolate and remove from heat. Let sit for a few minutes, then stir until smooth.

3) In a large bowl beat the eggs, sugar and vanilla for 3-4 minutes, until thick and pale yellow. Add the flour, baking powder and salt and beat just until combined.

4) Put about a third of the batter into another bowl and stir the pumpkin, oil, cinnamon and nutmeg into it. Stir the chocolate mixture into the remaining batter and spread a little more than half of it into the prepared pan. Top with the pumpkin mixture, then drop large spoonfuls of the remaining chocolate mixture on top. Swirl a knife through both to create a swirled effect.

5) Bake for 40 minutes, until just set and starting to pull away from the sides of the pan. Makes 16 brownies.

I hope this ends your weekend on a sweet note!

Click HERE & HERE for other festive Halloween dessert posts.

Wednesday, October 17, 2012

2012 fall looks for your locks

Your wardrobe’s not the only thing in need of an update this fall — admit it, you’re kind of sick of sporting the same beachy, messy strands every day, aren't you? Not to mention how fried your mane looks after all those months of fun in the sun. Clearly, it's time to change it up as fall 2012 gets underway.

{Style}

Blunt Bangs: If you’ve got ‘em, flaunt ‘em. Bangs are the ultimate hair accessory this season. Whether they’re full and square, short and rounded or just swept to the side, bangs frame the face and accentuate the eyes. When styling, start drying the bangs first and remember to use the nozzle attachment on your blow-dryer. The key to getting the perfect style is by directing the airflow straight down from the root . Using a vent or denman brush and brushing side to side will keep them sleek and prevent you from looking like you’re seven-years-old again and your mother just cut your fringe with some kitchen shears. No bangs? No worries! Go commitment-free and use clip-in textured bangs from LUXHAIR™. They are simple to use and come in a variety of shades.

 
Perfectly Imperfect: Your friend calls it bedhead, you call it beach hair. Call it what you want but it's fabulous and effortless. Imperfect texture catches the eye and leaves a statement. But you can’t get that seductively captivating coif without using great product. Word to the wise, invest in some dry shampoo or a sprayable root powder and some pomade. Dry shampoo or sprayable powder “dirties” up the hair and gives you instant playful texture. For the ends, rub a little pomade on your thumb and pointer finger and gently twist the ends of hair to keep texture waves in place.

 
Boisterous Bouffants: Not the Amy Winehouse kind, think more vintage Sophia Loren. This is going to be a great style for fall brides who want to ditch the updos and go for something more dramatic. When looking for a point of reference, flip through vintage magazines. Elle magazine even is chock-full of inspiration and throwback. Remember this, classics never make a comeback. They wait for that perfect moment to take the spotlight from overdone, tired trends.

 
Buns, Braids & Twists: Whether braided around the crown, coiled half-back or knotted into an updo, hair is getting manipulated into a fresh, new direction this season. While some looks require an extra set of hands, others put a simple and attainable twist on the classics. Double fishtails and triple braids are taking plaits to the next level. My advice to you: practice makes perfect. Grab some dry shampoo and start watching how-to videos. You’ll be surprised how simple some of these styles are to achieve.

 
Sweeping Side Part: The hottest look for a night out is a deep side part. If that part is not at least three inches in length then start over. The wider the part, the more open your eyes appear. It is an alluring and seductive look that will keep your date’s attention the entire night. To get the most drama out of the part, I recommend using the highest point of your eyebrow as a point of reference. Using a fine-tooth comb, slowly draw your comb back from the crown to create the part. Once the part has been created, spray medium-hold hairspray onto a boar bristle brush and brush hair on both sides away from the part to set it. Next, spray hair all over with a lightweight hairspray. To add a little glimmer and reflection, use small amount of shine serum along the part line. The light will bounce of it and make your eyes sparkle.

 
Perfect Ponytail: Ponytails this season, no matter if they’re high or low, are perfectly precise and chic and not that gym-wearing pony you’ve been trying to pass off as fashionable. Put some effort and styling into the look. It will only take two minutes and you’ll look like you just stepped off the runway and not out of a Body Pump class. First, prep your hair with a light serum to add shine. Pull hair back using a flat brush to get hair smooth. Secure with a band. Next, take a lightweight hairspray and spray lightly, To smooth down the surface and prevent those pesky bumps, spray hairspray onto a clean toothbrush (or a small hard bristle brush) and run it over the surface of your pony tail.

{Color}

 
Rich Chocolates & Cool Reds: You’re going to see a shift in color this season, especially in brunettes and reds. Color will go from less caramel to deep chocolate, less coppery to cool and slightly spicy crimson. During a color consultation, reference food as a visual. Hot fudge and orange marmalade paint a clearer picture and helps prevent end results that leave you feeling unsatisfied.

 
Brave Blonde: It’s time to say good-bye to flaxen and golden hues and hello to cooler, icy blondes and creamy white highlights. Now that the seasons are changing and your summer bronze-y glow is slowly fading, it’s important for all you blondes to adjust your hair color to complement your skin color. If icy and white is too extreme for your eye color and skin tone, then go more beige-y or even a little ash-y. Trust your colorist and let them determine what’s best for you. And don’t forget to maintain the look. Make sure you’re seeing your colorist on a regular basis, even if it is for a slight touch-up. Remember, when you stretch out your appointments the process if more intense and time consuming which results in a higher ticket price. Also look into shampoos that help neutralize the brass and keep you always looking cool.

{Cuts}


Bobs: Bobs come in all forms; angled, modern, lobs, etc. The cut and styling options are endless. They key to pulling of the perfect bob is finding a look that complements your bone structure. If you have a more round face, then opt for a lob with side-swept bangs. If you have a longer neck and pronounced chin, then a modern bob with a blunt fringe will make your eyes pop. It’s also important your stylist is up-to-date on his or her education. Don’t be shy to ask questions and inquire about them furthering their craft. If they haven’t taken a class in the past two years, then it’s time to find someone new.

Click HERE for the 20 hottest bobs of 2012

Thursday, October 11, 2012

How bad is it?


...to unpack your suitcase on your bed?

A: Super bad!!

I get on my husband about this all the time. Grosses me out. Think about all the surfaces those wheels have rolled across. I don't even want to think about what we brought back from the streets of San Fran last week.  Ew. Why is it so bad you wonder? The dirt and grime they pick can easily rub off on your linens. If that's not gross enough, your bag could be harboring the most unwanted guests ever: bedbugs. And if you haven't read my post on bed bugs, you may want to educate yourself now by clicking HERE.

Bottom line - never place your suitcase on a soft surface like a bed or a chair where bugs can scurry under the cushions or sheets. They multiple quickly so keep the suitcase far from the closet too where they can latch onto other clothes.

Best place to unpack is in the garage but that's extremely inconvenient. The next best - a hard surface like the floor in the bathroom or the laundry room. If you do find bugs, have it professionally treated immediately.

Sunday, October 7, 2012

Sweet Sunday

Simple, insanely delicious, and a fun Halloween treat!

~Brown Butter Pumpkin Rice Krispie Treats~
Posted by In Sock Monkey Slippers
Makes 12 treats

Ingredients:
 
5 Tbs butter, unsalted
1 16 ounce package of marshmallows
1/3 cup pumpkin puree, canned or fresh
1/2 tsp pumpkin pie spice
1/4 tsp fresh grated nutmeg
1/4 tsp vanilla extract, or paste
1/4 tsp sea salt
7 cups Rice Krispies Cereal or other puffed rice cereal

optional ingredients:
for squares: 1 cup dark chocolate chips (60% cacao or higher)
for pumpkins: 12 tootsie rolls, green cookie icing


Directions:

1) In a large, preferably non-stick, pot heat butter over medium-low heat until it turns light brown, about 5 to 10 minutes. Stir occasionally. It will bubble, foam, and then caramelize. This will give the treats a nice nutty background flavor.

2) Once the butter is browned, add marshmallows and pumpkin puree and turn the heat down to low. Stirring occasionally, cook the marshmallows until they are completely melted. Remove from heat.

3) Important step: Step away from this insanely good smelling marshmallow goop for at least 5 to 10 minutes. Stir occasionally until the marshmallow mixture cools and becomes thicker. If you add the Rice Krispies too soon they will just get soggy in the hot marshmallows. Once the marshmallow mixture is cooled and thickened add the Rice Krispies. Stir and fold until combined.

4) For traditional Rice Krispie Treat Squares: pour the mixture into a buttered (not oiled) 13x9x2 baking dish or pan. Allow to cool and set for 15 to 30 minutes. Cut into squares and remove from dish. Melt chocolate chips in the microwave in 30 second intervals, checking and stirring in between, until melted. Pour the chocolate into a Ziploc bag. With scissors, cut a small slit in the corner and use it as you would a piping bag drizzling the chocolate over the rice krispie treats.

5) If your feeling Martha Stewart'esk: For the pumpkins - skip the baking pan and pour directly on a piece of parchment or wax paper. Allow to cool and set for 5 to 10 minutes until pliable. Grab a large handful and form into a ball. Greased hands help with this. Insert a tootsie roll at the top for a pumpkin stem. With green cookie frosting create pumpkin vines and leaves around the base of the stem. Serve.

I hope this ends your weekend on a sweet note!

Saturday, October 6, 2012

Word of the Weekend: Pinnercise


{ PINNERCISE }:  To spend more time pinning exercise moves and motivational quotes on Pinterest than you do actually working out.

This made me laugh out loud. It's spot on.

Friday, October 5, 2012

Weekend Craft: Tangled Webs

 
If you're looking for a holiday appropriate, low cost, easy clean-up craft do with the kids, give this a try:

What you'll need:

Jars - small mason jars or baby food jars work best
Orange & black yarn
Elmer's Glue
Tealights

Directions:

For each candleholder, dip 48 inches (more if using a larger jar) of yarn into a one-part Elmer's glue, two-part water solution. Squeeze out excess; wrap strand around clean baby-food jar from top down. When dry, add a tealight and light the night.
Have a spook-tacular weekend!!

Wednesday, October 3, 2012

Nailed it: Top 3 fall favorites


Move over, eye shadow, and step aside, lipstick; there’s a new must-have beauty product this fall - dark and dramatic nail polish.

With a new season, comes new colors and with fall upon us, it's time to shake up your roster of go-to nail polish colors. You don't necessarily have to say bye-bye to those bright summer hues, but fall’s hottest nail ideas will definitely have you rethinking a shade or two.

While these aren't all of fall's latest nail color trends, these are my top three that I'll be sure to try:


 | GREY | 

China Glaze, Concrete Catwalk, $6


I love that grey is sticking around, and I'm not talking Fifty Shades of Grey. Consider concrete grey your new favorite neutral. Although it’s more eye-catching than nude or white, it won’t interfere with your everyday style.


| CHOCOLATE BROWN | 


Laura Mercier, Cocoa Suede, $18

Could brown become the new black?
Try this shade with gold rings or bracelets for a chic, modern kick.
 
 
| BURNT ORANGE |


L’OrĂ©al, L’Orange, $6

Why not match your nails to the fall foliage?


For the entire list of fall's nail trends, click HERE.

Monday, October 1, 2012

If you do one thing this week: Put Summer on Ice

 
Imagine biting into juicy strawberries or crisp green beans...in January. With the help of your freezer and tips from Teri Gault, CEO of the deal finding website thegrocerygame.com, you can savor the deliciousness of colorful fruits and veggies all year round.

{FRUIT}
Stock up on :: berries, tomatoes, and stone fruits like peaches, plums, and nectarines.
To preserve :: Wash and pa dry with paper towels. Hull strawberries and cherries and quarter tomatoes. Peel, slice and toss stone fruits with lemon juice and simple syrup to prevent browning. Place fruit in a single layer on a baking sheet (to keep it from sticking together) and freeze; transfer to zip-top bags.
Use within :: 3 to 6 months. Label the date of when you packaged with a Sharpie. Toss if you notice crystallization.

{VEGGIES}
Stock up on :: zucchini, green beans, peas, and spinach. Avoid produce with a high water content such as cucumbers.
To preserve :: Blanch first - drop vegetables in a pot of salted boiling water for 3 to 5 minutes, then plunge into ice water to halt cooking. After they've cooled, dry with paper towels, spread on a baking sheet, and freeze. Transfer to zip-top bags.
Use within :: 3 to 6 months. Label bag when packaged.

{HERBS}
Stock up on :: dill, rosemary, thyme, sage, oregano, basil, parsley, and cilantro.
To preserve :: Separate leaves from stems, then wash and pat dry. Chop and add 1 tablespoon of herbs to each well of a flexible ice cube tray and fill with water. Once frozen, remove cubes and store in a zip-top bag. The next time a soup, sauce, or stew recipe calls for fresh herbs, simply pop in a cube.
Use within :: 12 months. Label bag when packaged.


{HINT: When freezing produce in bags, leave a bit of space at the top for expansion.}